LAB 2 : Configuring Cisco Switch- CCNA
- Phornchai (Aj'A)
- 15 พ.ค. 2564
- ยาว 3 นาที
อัปเดตเมื่อ 14 พ.ย. 2565
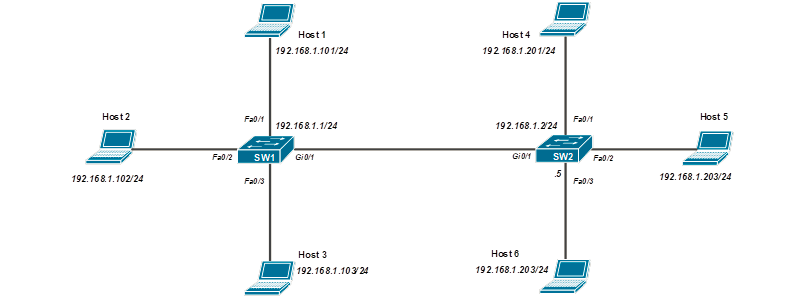
โจทย์ : จาก Network Diagram ทำการตั้งค่าบน Switch ตามหัวข้อดังต่อไปนี้

1. Hostname : SW1
2. Enable password :1234
3. Enable secret : cisco
4. Banner Motd
5. Line console 0 : password cisco
6. ให้ตรวจสอบ MAC Address ของ PC ที่เชื่อมต่ออยู่กับ Interface Fa0/1, 0/2 ของ Switch1 ด้วย Command บน Switch
7. ให้ทำการ Add MAC Address แบบ Static ลงใน MAC Address Table ของ Switch
8. ให้ทำการ Clear MAC Address ใน MAC Address Table ใน Switch ด้วย Command
9. สร้าง IP บน Interface และ Gatewayเพื่อใว้ Management บน Switch
IP Address 192.168.1.10/24 : Gateway 192.168.1.254
10. Username/Password Configuration
username admin privilege 15 password cisco
11. Telnet Configuration
Line vty 0 4 : password cisco
12. SSH Configuration
13. save Configuration
ดู Video :
Download ไฟล์ LAB คลิกด้านล่างนี้ :
Network Diagram :

Task and Configuration
1. 1. ตั้งค่า Hostname
เข้าสู่โหมด Privilege
Switch>enableเข้าสู่โหมด Configuration
Switch#configure terminalเปลี่ยนชื่อของ Router เป็น “SW1”
Switch(config)#hostname SW1ออกจากโหมด Configuration
SW1(config)#exitทำการตรวจสอบ Confiuration โดยการใช้คำสั่ง “show running-config” (Hostname จะเปลี่ยนแปรงทันที ที่ Enter command)
SW1#show running-config
------ตัดข้อความบางส่วน-------------------
hostname SW1
2. ตั้งค่า Enable Password
เข้าสู่โหมด Configuration
SW1#configure terminalตั้ง Password ก่อนเข้าสู่โหมด Privilege (ไม่เข้ารหัส)
SW1(config)#enable password 1234ออกจากโหมด Configuration
SW1(config)#exitทำการตรวจสอบ Configuration โดยใช้คำสั่ง “show running-config” และทดสอบเข้าสู่โหมด Privilege ใส่ Enable Password (1234) ที่ได้ทำการตั้งค่าไว้
SW1#show running-config
------ตัดข้อความบางส่วน-------------------
enable password 1234
3. ตั้งค่า Enable Secret
เข้าสู่โหมด Configuration
SW1#configure terminalตั้ง Password ก่อนเข้าสู่โหมด Privilege (มีการเข้ารหัส)
SW1(config)#enable secret ciscoออกจากโหมด Configuration
SW1(config)#exitทำการตรวจสอบ Configuration โดยใช้คำสั่ง “show running-config” และทดสอบเข้าสู่โหมด Privilege ใส่ Enable Secret Password (cisco)ที่ได้ทำการตั้งค่าไว้
SW1#show running-config
------ตัดข้อความบางส่วน-------------------
enable secret 5 $1$mERr$hx5rVt7rPNoS4wqbXKX7m0
4. ตั้งค่า Banner Motd
ตั่งค่า Banner ก่อนเข้า Router โดยตัวอักษรสัญลักษณ์ ^ เป็นสัญลักษณ์เพื่อบอกให้ทราบว่าเป็นตัวเริ่มต้นและปิดท้ายของข้อความ
SW1(config)#banner motd ^

^ใช้สัญลักษณ์ ^ ปิดท้ายข้อความ
ทำการตรวจสอบ Configuration โดยใช้คำสั่ง “show running-config” และ ทดสอบ Logout และ Login ใหม่อีกครั้ง แล้วสังเกตุ Banner ที่แสดงขึ้นมา
SW1#show running-config
------ตัดข้อความบางส่วน-------------------
#banner motd

^
5. ตั้งค่า Line console 0 Password
ตั้งค่า Password ก่อนเข้า Router ผ่าน Port Console
SW1(config)#line console 0ตั้งค่า Password
SW1(config-line)#password ciscoตั้งค่าให้มีการ login แล้วถาม Password ที่ตั้งไว้
SW1(config-line)#loginออกจากโหมด Configuration (ใช้ “end”จะกลับมาสู่ โหมด Enable)
SW1(config-line)#endทำการตรวจสอบ Configuration โดยใช้คำสั่ง “show running-config” และ ทดสอบ Login ผ่านสาย Console แล้วใส่ Password ที่ได้ทำการตั้งค่าไว้
SW1#show running-config
------ตัดข้อความบางส่วน-------------------
line con 0
password cisco
login
6. ตรวจสอบ MAC Address ของ PC ที่เชื่อมต่ออยู่กับ Interface Fa0/1, 0/2 ของ Switch1 ด้วย Command บน Switch
SW1#show mac address-table
Vlan Mac Address Type Ports
---- ----------- -------- -----
 1 000a.4180.e52c DYNAMIC Fa0/2
 1 000d.bdbc.becb DYNAMIC Fa0/1
7. ทำการ Add MAC Address แบบ Static ลงใน MAC Address Table ของ Switch
SW1(config)# mac address-table static 000d.bdbc.becb vlan 1 interface fastEthernet 0/1ตรวจสอบจากที่ทำการ Add MAC Address แบบ Static ลงใน MAC Address Table ของ Switch
SW1#show mac address-table8. ทำการ Clear MAC Address ใน MAC Address Table ใน Switch ด้วย Command
SW1#clear mac address-tableตรวจสอบจากที่ทำการ Add MAC Address แบบ Static ลงใน MAC Address Table ของ Switch
SW1#show mac address-table
Vlan Mac Address Type Ports
---- ----------- -------- -----
9. สร้าง IP บน Interface และ Gateway เพื่อใว้ Management บน Switch
เข้าสู่การตั้งค่า Interface Vlan 1
SW1(config)# interface Vlan1ตั้งค่า IP Address บน Interface Vlan 1
SW1(config-if)#ip address 192.168.1.1 255.255.255.0ตั้งค่า IP Gateway บน Switch
SW1(config)#ip default-gateway 192.168.1.254ทำการตรวจสอบ ตรวจสอบ Status Interface vlan 1 ด้วย command “show ip interface brief”
SW1#show ip interface brief10. ตั้งค่า Username/Password
ตั้งค่า Username และ Password ใน Switch (Local)
SW1(config)#username admin privilege 15 password ciscoตรวจสอบ Username/Password Local ที่ตั้งค่า
SW1#show running-config
------ตัดข้อความบางส่วน-------------------
username admin privilege 15 password 0 cisco
11. ตั้งค่า Telnet
ตั้งค่า line vty 0 4 (ให้มีการ Access โดยการ Remote จากระยะไกลเข้ามาตั้งแต่ line 0-4)
SW1(config)#line vty 0 4เรียกใช้ Username/Passwrod ที่เป็น Local ในการ login (จะไม่สนใจ Password ที่อยู่ภายใต้ line vty 0 4)
SW1(config-line)#login local หรือ เราสามารถตั้งค่าให้เรียกใช้ หรือ Authentication ด้วย password ภายใต้ line vty ก็ได้ ดังตัวอย่างต่อไปนี้
SW1(config)#line vty 0 4ตั้งค่า Password ใน Line vty จะเรียกใช้ Password ที่อยู่ใน Line vty ในการ login (ต้องตั้งค่า Enable Password ด้วย)
SW1(config-line)#password ciscoตั้งค่าให้มีการ Login ด้วยรหัสผ่าน
SW1(config-line)##loginทดสอบ Telnet เข้า Router “SW1”จาก PC
PC>telnet 192.168.1.1
Trying 192.168.1.1 ...Open Trying
172.29.16.1 ...Open
12. ตั้งค่า SSH
ตั้งค่าการ Remote เข้ามาโดยการใช้ SSH เริ่มจากการตั้งค่า domain-name
SW1(config)#ip domain-name ninehua.comGenerate Key เพื่อเข้ารหัส
SW1(config)#crypto key generate rsa ขนาดของ Key (ขั้นต่ำสำหรับ ssh version 2)
เลือกใช้ Secure shell Version 2
SW1(config)#ip ssh version 2ทดสอบ SSH เข้า Router “R1”จาก PC
PC>ssh -l admin 192.168.1.1
Open
Password:
13. Save configuration
ทำการ Save Configuration ที่อยู่ใน RAM ไปไว้ที่ NVRAM (Copy config ที่กำลังทำงานอยู่ไปเก็บใน NVRAM)
SW1#copy running-config startup-config
Destination filename [startup-config]?
Building configuration...
[OK]
ทำการตรวจสอบ Configuration ที่ทำการ save ไว้ด้วยคำสั่ง “show startup-config”
SW1#show startup-config
Using 728 bytes
version 15.1
------ตัดข้อความบางส่วน-------------------


Comentarios